
Boat Computer MkII
![]()
![]()
![]()
The Boat Computer provides a colourful display of your speed as well as your heading, latitude/longitude, the current time or the direction and distance to a Point of Interest (POI).
It can be configured using its touch sensitive screen to display the speed in knots, km/h or mph as well as customising over fifty POIs with each having their own name and coordinates.
It is based on the low cost Micromite LCD Backpack (described elsewhere on this web site) and will work with almost any GPS module on the market. The whole thing can be built for as little as US$40 and would be a great addition to any small boat.
The Boat Computer MkII was described in the April 2016 issue of Silicon Chip magazine. This web page provides a short description so, if you want the full story, you are encouraged to read the magazine article Back issues of the article can be purchased from Silicon Chip or electronic access can be purchased for about the cost of the printed issue.
My first Boat Computer was published in October 2010 (link) and that is why this one is called MkII. It is interesting to see how far technology has progressed in five years.
Micromite LCD Backpack
The Boat Computer MkII is based on the Micromite LCD Backpack which a combination of a low cost colour LCD display and a 32-bit microcontroller programmable in BASIC. In part this project was created to provide an example of what the Micromite is capable of so please feel free to download the BASIC program and extract portions of it for your own projects.
To make it easy to experiment with the code the Boat Computer includes a demo mode which will display typical data allowing you to explore the displays and menus, even if you do not have a GPS module connected. This means that you can experiment with the program on any Micromite with a suitable LCD screen. To try it out, you enter the demo mode by touching the centre of the screen at power on.
Using the Boat Computer
On power up the Micromite will try to detect the baud rate of the GPS module and while it is doing that it will display the message "Searching for GPS". When it has detected the GPS module the display will switch to "Searching for Satellites" which means that the program has found the GPS module which is now searching for enough satellites to get a fix. Finally, when a fix has been achieved, the display will change to a speed and information panel as shown below.
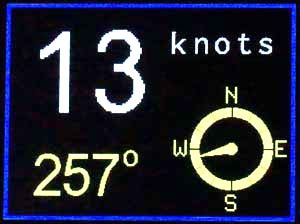
This display is divided into two halves, the top half shows your speed while the bottom half can be set to show a variety of information as illustrated below:
 |
 |
 |
||
The bottom half of the display is showing the current heading both in degrees and as a compass rose. The Boat Computer uses forward motion to determine the heading so the boat needs to be moving for this to be valid. |
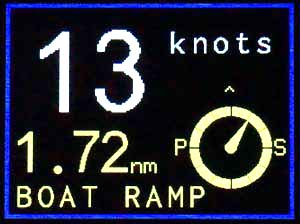
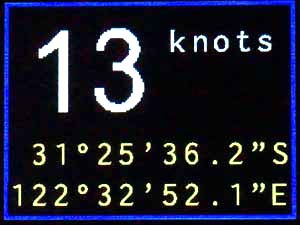
Here the display is showing the relative bearing to a point of interest (in this case a boat ramp). To navigate to a POI all you need do is steer towards the pointer and watch the distance reduce as you get closer. | In this example the information panel is showing the boat's current latitude and longitude in degrees, minutes and seconds. Like all displays this is updated every second. |
Not shown above is a fourth display which will show the current time in the lower half. This is derived from the GPS time and is therefore very accurate
 Repeatedly touching the top half of the screen will switch the speed units to km/h, then mph and back to knots.
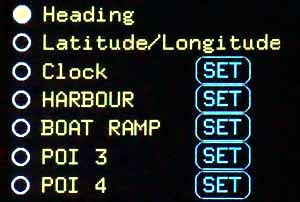
Touching the bottom half of the screen will bring up the menu shown on the right. Touching any entry in the list will select that as the default display and return the display to the main screen showing the speed and the newly selected data. Note that with later versions of the software you can now have over fifty POIs.
All configuration parameters and settings (including this one) are saved in non volatile memory and will be automatically reinstated on power up
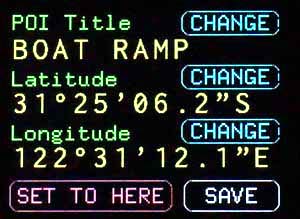
The SET button beside some of the entries enables that entry to be configured. The photographs below shows what some of the configuration screens look like.
 |
 |
 |
||
This is the screen used to change a point of interest. The title and coordinates can be changed with the CHANGE buttons. A useful feature is the SET TO HERE button which will set the coordinates to the current location. |
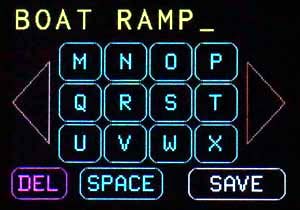
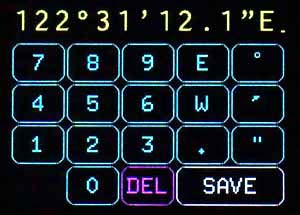
Here you can change the title used for a point of interest. The right and left triangles will scroll through the alphabet while touching a button will add that character to the end of the title. DEL will backspace and delete the last character. | This is the on-screen keypad used to enter a GPS coordinate. Touching a key will append that number or symbol while the DEL key will backspace and delete the last character. |
Circuit Diagram
The Boat Computer is just the Micromite LCD Backpack with a GPS module. For details of the Micromite LCD Backpack see this web page and for the 28-pin Micromite see this web page.
Below is the circuit diagram of the full Boat Computer including the Micromite LCD Backpack.
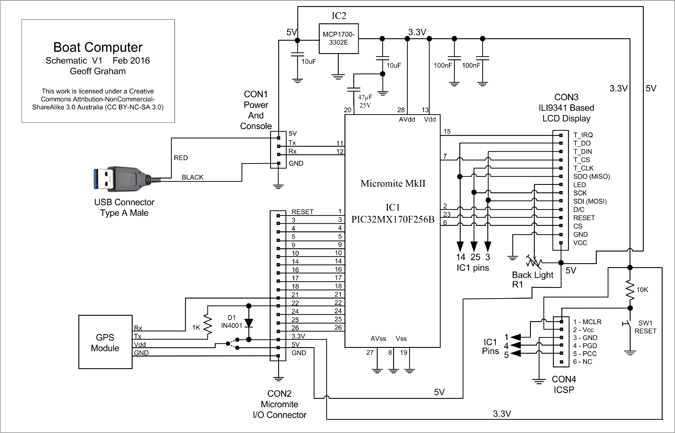
The power supply for the above circuit comes from a standard 5V USB charger with at least 500mA capacity. To make a cable for this you need to cut one end off a standard USB cable (retaining the end with the type A connector) and connect the red wire to the 5V pin on CON1 and the black to ground. The other two wires in the cable can be cut short.
The circuit has provision for the GPS module to be powered from 3.3V or 5V, both of which are supplied by the backpack. The 1K resistor and diode on the Tx line from the GPS module are there to protect the Micromite if the module uses RS232 signaling. If you are sure that the module uses TTL you can leave out the diode and replace the resistor with a link.
The Boat Computer program has been written to suit almost any GPS module on the market. It will work with either 3.3V or 5V modules and will automatically search for the correct baud rate in the range of 4800 baud to 38,400 baud. It will automatically accommodate modules that use either TTL or RS232 signaling voltages and it uses the RMC message which is standard across all GPS modules. The only modules that the Boat Computer cannot work with are ones that have a USB interface.
Suitable modules include:
- Fastrax UP501
- USGlobalSat EM-408
- Ublox NEO-7M-C
- Ublox NEO-6M
- Skylab MT3329/SKM53
- V.KEL VK16HX
- Ublox or V.KEL VK2828U7G5LF
At the time of writing the last one is available for about $20 (incl free freight) from Banggood.com.
As each module is different you will have to invent your own method of mounting it. The simplest would be to fasten it to the inside top of the box (perhaps using glue) and use flying leads to connect it to the Micromite LCD Backpack. The important thing is that the antenna (the square ceramic object on top of the module) must be positioned so that its top surface is horizontal and pointing to the sky. Some modules do not have an antenna and in that case you will have to purchase it separately.
Check the data sheet for your module as some have an enable input which often must be connected to Vcc to take the module out of power saving mode.
Be warned that all GPS modules will take some time (up to an hour) to get their first fix after being powered up for the very first time. See my page on the EM-408 for a more detailed explanation.
Construction
The first step is to build and test the Micromite LCD Backpack as described on its web page. You can use the 2.4 inch version if you wish but the 2.8 inch version provides a more legible display. There are four steps in the process of loading the firmware:
- Load the Micromite firmware using a PIC32 programmer (see this page).
- Configure the Micromite for the LCD display (see the Micromite LCD Backpack Construction Pack).
- Load the file BoatComputerFonts6.bas (see the download area below) onto the Micromite and then use the command LIBRARY SAVE. This will transfer the fonts into the Micromite's library space and delete them from main memory. This is necessary because it also compresses the fonts allowing more space for the main program. For more information on the library feature see the Micromite User Manual.
- Load the BASIC program BoatComputer6.bas (see the download area below).
You can reduce this to one step by simply programming a blank PIC32 with the file BoatComputerFull6.hex (available at the bottom of this page). This combines all four steps into the one file which includes the Micromite firmware, the settings for the display panel, the fonts and the Boat Computer BASIC program.
If you do not have a PIC32 programmer you can purchase a 28-pin PIC32 microcontroller from Silicon Chip magazine pre programmed with the full firmware (ie, BoatComputerFull6.hex) by following this link. This makes it very easy, all that you need do is just plug the chip into its socket on the PCB.
Silicon Chip also offer a full kit of parts for the Boat Computer including the Micromite LCD Backpack, their front panel, GPS module, the PCB, etc. Follow the above link if you are interested.
Updated Program
Since the Silicon Chip article I have updated the Boat Computer program and it is now at version 6. The change log included in the download files has the full details but these are the highlights:
- You can now have over fifty Points of Interest. In the main selection screen you now use PREV and NEXT buttons to take you through the list of POIs.
- The heading indicator and POI direction indicator are now suppressed when the boat is stationary.
- Improved the rendering of the heading needle.
- Removed the slash from the numeric zero character in one of the fonts.
If you have Ver 1 or Ver 2 you should update as they had some serious bugs.
The updated files are available for download from the bottom of this page.
The Case
When it comes to housing the Boat Computer the main concern is to protect the electronics from salt spray or even salt laden air. This is not as easy as it sounds because the touch sensitive screen must still be available to probing fingers.
One solution is to use the box and front label method that I described for the Parking Assistant - the main difference is that you should not apply talcum powder which will allow the label to stick onto the front surface of the LCD display panel making a spray proof seal.
Another, possibly better approach, is that employed by Silicon Chip magazine where they used a close fitting laser cut transparent lid that replaces the standard lid supplied with an UB3 ABS “Jiffy” Box. After you have tested everything and verified that it is working correctly you can apply a thin bead of transparent silicon sealant around the edge of the LCD display and fasten it to the laser cut lid. Because the fit of the lid is so close the sealant will fill any gaps thereby protecting the internals of the box. Silicon Chip's lid can be purchased from their website.
In either case you should also use sealant around the hole where the power cable enters the UB3 box and where the lid fastens onto the box making the box totally sealed. Dismantling this will be hard work, so this is why it is important to test everything first.
| Boat Computer BASIC Program version 6 (includes BoatComputerFonts6.bas and BoatComputer6.bas) |
DOWNLOAD |
| BoatComputerFull6.hex (version 6) This is a combined firmware file that contains the Micromite firmware configured for the LCD panel, the fonts loaded into the library and the BASIC Boat Computer program. |
DOWNLOAD |