Surface Mount is Easy
![]()
![]()
![]() Using SMD or surface mount components is often regarded as difficult and to be avoided at all costs - but that is a great waste.
Using SMD or surface mount components is often regarded as difficult and to be avoided at all costs - but that is a great waste.
Not only are surface mount devices relatively easy to solder they also open up a world of sophisticated devices for you to use - from accelerometers to high performance microcontrollers.
Prototyping and soldering these devices might use a different technique from the normal soldering style - but it is not difficult. All you need is a good soldering iron and a steady hand.
This page summarises my views and techniques on using these components. It is aimed at the hobbyist who might want to assemble a few projects using some surface mount devices and does not want to turn it into a major production.
Just Solder It
I suppose that the central message is that you should just solder the components to the board by hand using a soldering iron. This may sound like heresy but it is the simplest and easiest approach.
If you are like me and have searched the Internet on this subject you will have come across many web sites promoting soldering techniques using almost every heat source imaginable including SMD ovens, toaster ovens, infra red lamps and more. When I started on this path I seriously considered buying an SMD oven (cost >$1000) but fortunately I decided to experiment first.
I tried a hot air gun, an electric fry pan and a toaster oven and found that the main problem is not the source of heat but applying the solder paste. When you apply the solder paste by hand it is almost impossible to get a consistent layer on the right spots on the PC board - too little and the component will not solder correctly and too much will create a blob causing shorts. The solder paste also tends to smear when applied by hand and that will make a mess or cause shorts between closely spaced pads. Big manufacturers will use a stencil to get the right coverage but getting a stencil made up for each design is expensive and complicated when you just want to assemble one or two boards.  Buying solder paste is also a major hassle, it is expensive, has a limited life and must be kept in a refrigerator.
In the end I reverted to simply hand soldering the devices and that turned out to be the easiest and most straight forward method. Rather than explain the technique it is best if you watch this excellent video created by the Curious Inventor (Surface Mount Soldering 101). This shows you everything that you need to know and, as you can see from the video, you do not need much equipment - but you do need a steady hand.
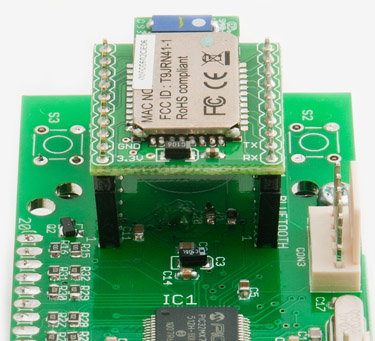
The photo on the right shows a recent project where all the components (including the big IC) were hand soldered and the result is excellent. The photo at the top of this page shows the microcontroller chip from a different angle - the pins on the chip are separated by just 0.2mm but the result is just as good as an expensive SMD oven.
The Tools
The video shows you most of the tools that are necessary but I cannot resist adding a few observations of my own.
First a temperature controlled soldering iron is important. It does not have to be fancy (mine is a cheap model) but it must be temperature controlled. I have found that a 1.6mm chisel tip suits me but probably a 0.8mm would be better. You need a reasonably large sized chisel tip as you often need to carry solder on the iron's tip to the joint and a fine pointed tip will not hold enough solder.
You also need a good liquid flux (I use Electrolube SMF12P). This is because with SMD soldering you often carry the solder to the joint and the flux in the solder  core will have boiled off. The remedy is to use a good flux on the joint before you apply the iron and the result is like magic, the solder will flow freely and quickly resulting in a great joint with the minimum of heat.
A pair of fine tipped tweezers are also invaluable as you need to pickup and manipulate components that are only a millimetre or two in size.
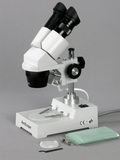
For me the most important tool is a good magnifier (my eyes are not that great). A magnifying loup with a power of x10 is a good start but I found that the one that I bought only focused at a distance of 20 to 30mm and that was dangerously close to my face while I was waving the soldering iron about. I ended up buying a cheap Binocular Dissecting Microscope (from Amscope) and that is perfect. You do not need a high magnification, selectable x10 for soldering and x20 or x30 for close inspection of the joint works for me.
How I Do It
Most people have no problem with surface mount passive components, after all, if you destroy one you will probably have many others to replace it with. The biggest fear is with the large TQFP packages like the one pictured at the top of this page.
So, this is my step by step guide (in all the gory detail) as to how I solder these chips. It sounds complicated but it is not hard to do and after a few chips you will get into the rhythm and it will be second nature, just like soldering through hole components. With practice you can optimise this process but it is a good start.
First, get ready:
- Solder the large multipin chips first, this gives you the room to manoeuvre.
- Position the PCB on a solid surface and hold it down (BluTack is good for this).
- Run flux over all the solder pads of the chip that you want to solder.
- Place a dab of solder in pin 1 and the diagonally opposite pin. This should be just a small amount, just a smear or a small hump at the most.
- Carefully remove the chip from its packaging and place it on the PCB. I say carefully because the metal used for the pins is often very soft and they will easily bend.
Next, align and secure the chip:
- Using your magnifier set it to x10 power and slide the chip around until it is as close as possible to the correct position with the pin 1 dot aligned with pin 1 on the PCB.
- Place a small amount of BluTack (smaller than a match head) on the far corner of the chip from pin 1. This is to hold the chip in position while you solder the first pin. Make sure that the BluTack does not touch the pins of the chip because they will bend out of shape when it is removed.
- BluTack is good because it allows you push the chip around a little. Gently nudge its body so that the pins are exactly aligned to the solder pads.
- Place flux on pin 1 and solder it (you previously placed the dab of solder here). You should not need any extra solder for this as there will already be enough on the solder pad.
- Check the alignment of all the pins and fix it if it is not good.
- Flux and solder the diagonally opposite pin (again previously tinned). The chip is now held secure with two pins soldered.
- Remove the BluTack (don't bend any pins).
Now, solder the pins:
- Apply plenty of flux to all the pins (this is the secret to successful soldering of SMDs)..
- Place a small amount of solder on the tip of your iron - if it makes a ball you have way too much. It should be a smear of solder or at the most a small bump. You will be amazed at how long a tiny amount of solder lasts, for me it will easily do one side of a 100-pin chip (ie, 25 pins).
- Solder each pin by placing the iron's tip on the solder pad and slide it forward until it touches the pin - the solder should flow like magic. Under the magnifier the tip of the iron will look huge and will probably bridge two or three pins but, if you have only a small amount of solder on the iron, it will not form a solder bridge.
- If you do create a solder bridge leave it for later. Reduce the amount of solder on your iron and continue with the rest of the pins.
Finally, cleanup and check:
- When you have finished you can remove any bridges with solder wick. Put plenty of flux on the bridge and the solder wick. Gently place the wick over the flat of the pins (where they sit on the PCB) and apply the iron. Be aware that the solder wick can suck up all the solder so after this operation you should re solder the pin(s). Don't forget the flux.
- Finally get a higher magnification (x30 is good) magnifier and carefully check each pin to make sure it is perfectly soldered and that there are no small solder bridges left.
Practice Kits
The best way to overcome the fear of surface mount is to practice on something that does not matter. You can buy some great practice kits on eBay - they don't cost much (less than $10) and include a PCB and miscellaneous components. With one of these you can mess around to your heart's content without the fear of wasting a good chip or board.
Search eBay for "SMD practice" or use this link.
Prototyping
One argument against using surface mount components is the difficulty of prototyping with them. I have found that this is not a problem as there are many adapter boards (or breakout boards) that you can buy to suit most SMD packages. All you need to do is solder the chip to the board and then you have access to the pins on a 0.1 inch pitch.
A good source is Futurlec, but SparkFun have quite a few and if you search eBay you will find many more.

Design Techniques
When you decide to use surface mount devices you do not have to make everything surface mount unless you want to make your gadget as small as possible. A good example is the Maximite (described elsewhere on this site) which uses just one surface mount chip - the rest of the components are easy to solder standard sized devices.
Another technique is to purchase surface mount components that are already soldered to a breakout board. This means that you can treat the board/chip combination as a large IC and plug it into your project as it is. The photo on the right shows a pre assembled Bluetooth module that I designed into a project as a plug in module.
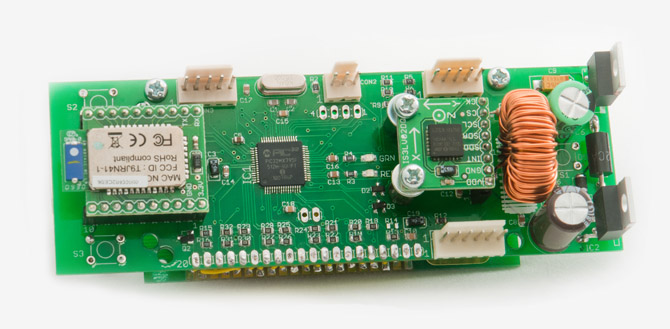
The photo below shows the full board with the Bluetooth module and an accelerometer mounted on a header board. The accelerometer is an example of where you must use a pre assembled header board as the chip is a QFN package which has the solder tabs on the underside of the chip and is therefore impossible to hand solder.
The best supplier for pre assembled header boards is SparkFun who have a huge range covering USB interface chips, Ethernet chips, special SMD connectors and more. Also, more and more vendors on eBay are following suit so there is a wide range of sophisticated components that are available and ready to plug into your circuit.

