3D Printed Cases
![]()
![]()
![]() Getting a custom 3D printed case made for your next project is easy and inexpensive. This page describes how I did it and ended up with a professional result for not a lot of money and only a bit of effort.
Getting a custom 3D printed case made for your next project is easy and inexpensive. This page describes how I did it and ended up with a professional result for not a lot of money and only a bit of effort.
If you need a custom case you could buy a 3D printer and make your own but now there are many companies who will print your design for you. And, because they have large industrial printers and a wide range of materials, they can produce an excellent and inexpensive result.
In the past we etched and drilled our own PCBs but now we just send the design files to China and wait for them to send the professional result back. Now it is the same for a 3D printed box.
This page is written for the average hobbyist who just wants a custom case without becoming a 3D printing expert.
You may want to follow a different path but this worked for me.
Why a Custom Printed Case?
Compared to a standard off the shelf box, there are some good reasons for designing your own:
- You get exactly what you want, the correct size, the correct holes in the right places and so on.
- The holes and features are properly made, not an irregular mess that often happens when cutting by hand.
- It is reasonably inexpensive considering what you get - typically US$15 to $30 (plus freight).
- The result is professional, just like a mass produced product.
There is also a downside... learning the software can be a huge undertaking. As an indication, learning how to produce the case in the photo above took me about 2 weeks. But now that I know the tricks the next one should be much quicker.
The Software
The first step is to select the design software that you will use. There are many free and paid packages available but they vary a lot in their capabilities and their target audience. For example, some are optimised for film, TV and animation studios. A Goggle search will reveal many options such as these: https://www.howtogeek.com/the-best-free-3d-modeling-software/
One problem with selecting a package is that you can spend a lot of time learning the ins and outs of it only to be stopped at some critical point because it cannot do something that you need. For example, I spent a lot of time with TinkerCAD before discovering that it could not do a proper smooth bevel on corners.
In the end I settled on Blender (https://www.blender.org) which is free and open source and is very capable being able to do almost everything. However, it is also complex and has some annoying traps and hidden operations that can turn your hair gray. The breakthrough was when I discovered this YouTube video: https://youtu.be/rN-HMVTB7nk. It leads the viewer through the steps needed to make an instrument case using Blender, including the tricks needed to get around some of Blender's idiosyncrasies.
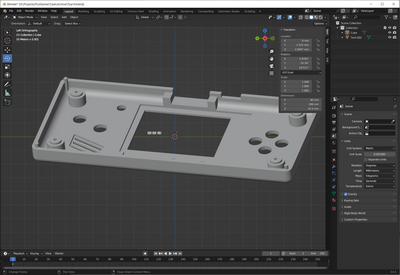 |
| Blender in action |
One serious issue with Blender (and I suspect many other packages) is the way that the workflow is done.
Essentially you start with a solid cube and then cut holes, extrude other parts, bevel corners, etc until you have what you want. The problem with this is that if you discover a mistake made near the beginning, you will have to undo everything until you get back to the mistake. Then, after fixing the mistake, you will have to redo all the steps to return to where you were up to.
Even worse, Blender has a limit on the number of undo steps that it can do. The best way to handle this situation is to check everything as you go and save many copies as you advance through the design, Then you can easily go back to a previous version that was good.
Despite this, it was worth persevering with Blender given that it could do everything that was needed.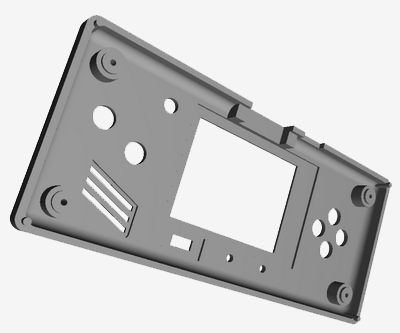
Verifying the Design
One of the good things about a 3D design is that you can display exactly what your box will look like and you can rotate it and view it from many different perspectives. This is almost as good as having the finished product in your hand and is invaluable for discovering imperfections and things that are not quite correct.
Your modeling software will do this for you but you can independently check it by exporting your design files and use an online tool like https://www.viewstl.com. This will allow you to rotate, zoom in and check every angle. As shown on the right, you can see exactly what your final result will look like.
If you want to try this out for yourself you can download the files for this design from here and load them into https://www.viewstl.com.
Getting it Made
There are many companies around the world who will 3D print your design. I ended up using JLC3DP in China (https://jlc3dp.com) as I have had good experiences in the past with their PCBs.
All that you need to do is export your design as an STL file and copy it up to their website. When you do this JLC3DP will assign an engineer to check your design first, so expect some delay and be prepared to alter your design if they think that it cannot be made. This process is fast and only took a couple of days.
I opted for their default process which is Stereolithography (SLA) technology using the LEDO 6060 resin. The result was perfect, the finish was smooth in an off white colour that was slightly translucent. Everything was positioned perfectly with sub millimetre precision and there was no warping or other defects.
About the only issue is that the LEDO 6060 resin will go slightly yellow with age. This was not a huge problem as I spray painted the box in my choice of colour. The resin easily takes to paint and I used Rust-Oleum 340g Satin 2X Ultra Cover (available in Australia from Bunnings) which did a perfect job. If you are new to spray painting remember to spray very lightly and build up the coverage with a number of light coats letting it partially dry between each coat.
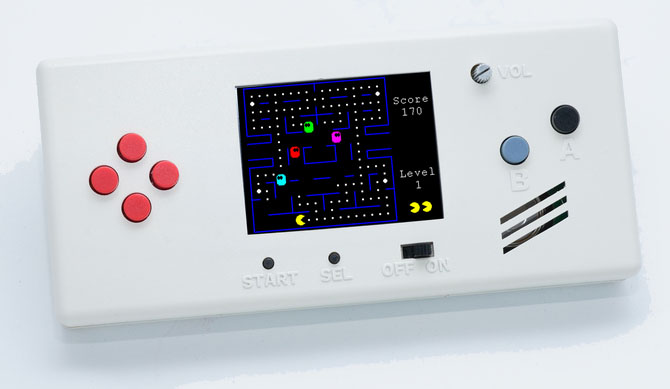
The Result
The case illustrated above was used to house the Pico Gamer (http://geoffg.net/picogamer.html). The finished product (below) is everything that you could wish for.