
MMBasic on the Original Colour Maximite
![]()
![]()
This page provides an introduction to Maximite BASIC (or MMBasic) and an overview of its special capabilities.
MMBasic has recently been upgraded to version 4.0 and it is recommended that you upgrade to this version as it provides many modern features including a full screen editor.
MMBasic has moved beyond the Maximite and has been ported to other platforms. It now has its own website at http://mmbasic.com. There you can download other versions of MMBasic including a version that runs in a DOS window on Windows XP/Vista/7. This page is intended to highlight the unique aspects of MMBasic when used on the Maximite.
MMBasic Compatibility
The BASIC language started off many years ago as a teaching tool and, because of its ease of use, quickly spread to become the most popular language for personal computers. This popularity spawned many variations of the language all of which carried the name "BASIC" and after a while that got quite confusing as these variants deviated considerably from the original. Some modern versions of BASIC (for example Microsoft's Visual Basic .NET) have only a superficial resemblance to the original BASIC language.
Rather than invent yet another variation, MMBasic was designed to mimic the original Microsoft BASIC (also known as MBASIC, BASICA or GW-BASIC) which was supplied with the Tandy TRS-80, Commodore 64 and the early IBM personal computers. If you want to download programs for the Maximite or learn more about BASIC it would be best to look for references that use the original Microsoft BASIC.
For a full description of MMBasic you should consult the Maximite User Manual.
Entering Programs
One important feature of MMBasic (and Microsoft BASIC) is that you can enter any command at the input prompt and it will be executed immediately. This is invaluable for testing the language and learning what each command does.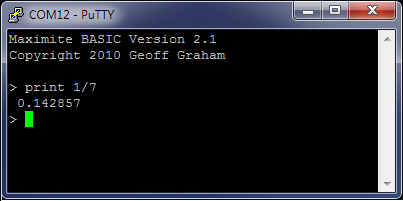
The screenshot on the right gives an example. The > symbol is the MMBasic prompt and PRINT 1/7 was the command typed in. MMBasic responded by calculating the result of dividing one by seven and printed the result out. It then displayed the prompt again and waited for the next input.
A characteristic of the old Microsoft BASIC is that programs are based on line numbers. Each line in a program is preceded by a line number and to enter a program line into memory, you simply prefix the line with a number and MMBasic will store it along with any other program lines.
To run a program saved in memory you just use the command RUN at the command prompt. You do not need a compiler or operating system and the results are immediately available.
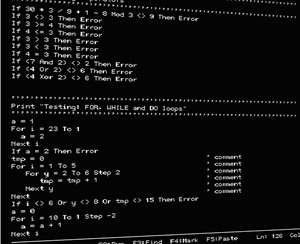
In versions 3.0 and later of MMBasic you do not have to use line numbers (they are still accepted for backwards compatibility) and you can use the full screen editor which includes modern features such as searching and cut and paste. That makes writing programs much easier and brings MMBasic into the modern age.
Using the full screen editor you can make your changes and press the RUN key. The program will be saved back to program memory and automatically run. If it fails with an error you can invoke the editor again and the cursor will be automatically positioned at the line that caused the error. As a result the edit-run-edit cycle is very fast and productive.
Variables
In MMBasic all numbers are floating point which means that they can contain a decimal point and are safe to use in any type of calculation.
Variables names can be up to 32 characters long and can contain alpha numeric letters, the full stop and underscore characters. This means that you can use meaningful variable names in your program. For example: BatteryVoltage or test_load2
MMBasic will also work with strings which are a collection of characters. A constant string must be surrounded by double quotes and string variables are designated with a $ character at the end of the variable name. For example:
> FileName$ = "INFIX" + ".DAT"
> PRINT FileName$
INFIX.DAT
>
When used with strings the plus (+) operator will joint together strings so the above example will join the constant strings INFIX and .DAT and save the result in a string variable. There are many 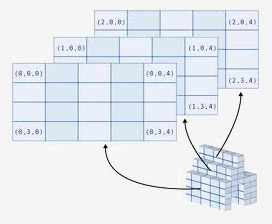 functions in MMBasic like this that can be used to pull apart and manipulate strings and this capability is one of the strengths of MMBasic.
Another type of variable is the array. MMBasic allows arrays of numbers or strings and they can have up to eight dimensions. For example, the following sequence of commands will create a three dimensional array with 10 elements in each dimension (a total of 1000 individual numbers) and save a number into the array:
> DIM AData(10, 10, 10)
> AData(3, 5, 8) = 1234.5
> PRINT AData(3, 5, 8)
1234.5
>
External Input/Output
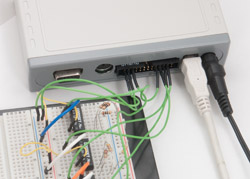
The Maximite has 20 external input/output pins and MMBasic has two commands for handling these. The Colour Maximite has an additional Arduino compatible connector which provides an extra 20 input/output pins (40 in total).
The SETPIN pin, cfg command will configure a pin for either input or output. For example the following command will configure pin 9 as an analog input: SETPIN 9, 1
The 'cfg' parameter can be any one of the following:
0 = Not configured or inactive
1 = Analog input
2 = Digital input
3 = Frequency input
4 = Period input
5 = Counting input
6 = Interrupt on low to high input change
7 = Interrupt on high to low input change
8 = Digital output
9 = Open collector digital output to 5V
Once a pin has been configured you can use the function PIN(pin) to
 get data from an input and the command PIN(pin) = to set an output. As an example the following program fragment will set pin 2 high if the voltage on pin 1 is outside the range of 1.5V to 2.5V.
510 SETPIN 1, 1 ‘ pin 1 is input
520 SETPIN 2, 8 ‘ pin 2 is output
530 V = PIN(1) ‘ get the voltage
540 IF V < 1.5 OR V > 2.5 THEN
550 PIN(2) = 1 ‘ output high
560 ENDIF
Note that the construct PIN(nbr) can be used as both a source of data (ie, returning a value) and as a means of setting an output (PIN(2) = 1). This fragment also demonstrates the use of the comment character ('). Anything after this character is disregarded by MMBasic.
Interrupts
Any external I/O pin can be configured to generate an interrupt using the SETPIN command with many interrupts active at any one time. Interrupts can be setup to occur on a rising or falling digital input signal and will cause an immediate branch to a specified line number (similar to a GOSUB). The target line number can be the same or different for each interrupt. Return from an interrupt is via the IRETURN statement. All statements (including GOSUB/RETURN) can be used within an interrupt.
As an example, the following code fragment will detect if the user has pressed a button (connected to pin 16) and, if so, will set the output of pin 15 high (this could operate a relay or something similar).
100 SETPIN 15, 8 ' pin 15 is a digital output
110 SETPIN 16, 7, 500 ' pin 16 is a digital input with interrupt code at line 500
120 DO
130 ‘ main processing loop (your main program would go in here)
140 LOOP
150 ‘
500 ‘ start of the interrupt routine, executed if pin 16 goes high to low
510 PIN(15) = 1 ' set pin 15 high
520 IRETURN ' return to the main processing loop
When using interrupts the main program is completely unaffected by the interrupt activity unless the interrupts alters variables used by the main program. For most programs the Maximite will respond to an interrupt in under 100µS. To prevent slowing the main program by too much an interrupt should be short and execute the IRETURN statement as soon as possible.
SD Card Storage
MMBasic has a number of commands for saving and loading programs from the SD card. For example SAVE "MYPROG.BAS" will save the program currently in memory to a file on the SD card called MYPROG.BAS. You can later load that program back into memory with LOAD "MYPROG.BAS" or both load and run it at the same time with RUN "MYPROG.BAS".
The filename AUTORUN.BAS has special meaning. MMBasic will search the SD card for this file on power up and if it is found it will be automatically loaded and run.
MMBasic also has commands for managing the SD card. For example, the FILES command will list all of the files in the current directory (or folder as they are called in Windows). CHDIR can be used to change to a new directory, MKDIR will create a new directory and RMDIR will delete a directory.
Inside a running program you can save and read data to and from the SD card. First a file must be opened using the OPEN command and then you can use the PRINT or INPUT commands to write and read from the card.
For example, the following fragment will save the values of three variables into a file:
200 OPEN "MYDAT.DAT" FOR OUTPUT AS #1
210 PRINT #1, Var1
220 PRINT #1, Var2
230 PRINT #1, Var3
240 CLOSE #1
Files can be opened for input, output and append and you can have up to 10 files simultaneously open.
Graphics
MMBasic has commands for clearing the screen (CLS), turning a pixel on or off (PIXEL), drawing lines and boxes (LINE), drawing a circle (CIRCLE) and saving the video screen as a BMP file (SAVEBMP). You can also position text anywhere on the screen by using the LOCATE command. For example, the following fragment will draw a box and print the word STOP in the middle.
200 LINE (50, 75) - (150, 125), 1, B
210 LOCATE 80, 95
220 PRINT "STOP"
Support for Colour
With version 4.0 MMBasic has support for colour on the Colour Maximite. Text, graphics and animated sprites can be displayed in eight colours (including black and white). MMBasic allows the selection of a number of different colour modes. This allows the programmer to trade off the number of colours to be displayed against the memory and performance demands that colour introduces.
This page has only touched on the highlights of MMBasic, there are over 200 commands and functions and for a full description you should download the Maximite User Manual (available at the bottom of the main Maximite page).
MMBasic also has its own website at http://mmbasic.com. There you can download other versions of MMBasic including a version that runs in a DOS window on Windows XP/Vista/7.
More Information
For information on the Colour Maximite click on these links:
- Description and Specifications
- Design and Construction
- UBW32 version of the Colour Maximite
- Photo Gallery
For details of the original (monochrome) Maximite click on these:
- Description and Specifications
- Design and Construction
- The mini-Maximite, a miniature version of the Maximite for embedded systems
- The DuinoMite, a Maximite clone
Other useful pages:
- The MMBasic home page at http://mmbasic.com
- Firmware downloads
- Frequently Asked Questions
- The Maximite Story (how it came about)